Wednesday, May 11, 2011

Vegan Cadbury Creme Eggz... no, not eggz, FROGS!

written by Emily

Brace yourself, spring readers* your minds are about to be blown.

* Disclaimer: If you read this blog I know you’ve gotten used to recipes that integrate fresh produce, deliciousness, and… nutrition. This one just focuses on the deliciousness part. There is nothing from the garden in this recipe. This is the dark side of Spring Around the Bend, and fighting it would be futile.

After several years of making beautiful and amazing vegan Cadbury eggs as an annual springtime treat, Emma had a stroke of genius. She fully embraced her British roots and the result is absolute perfection, a love-child of the Cadbury Egg and Harry Potter’s chocolate frogs. That’s right: a homemade candy, vegan, chocolate covered, and decidedly nerdy, life is good.

In order to accomplish this for yourself, you’re going to need to find the following very healthy ingredients at your local earthy-crunchy store:

1/2 cup light corn syrup

1/4 cup earth balance, softened

1 teaspoon vanilla

1/4 teaspoon salt

3 cups powdered sugar

4 drops yellow food coloring

2 drops red food coloring

1 12-ounce bags vegan chocolate chips (2 bags needed for frog molds, or 4 cups)

2 tablespoons vegetable shortening

I was kidding about the earthy-crunchy store; buy this stuff somewhere you won’t be ashamed to go to the check-out.

You’ll also need a frog-shaped chocolate mold. Thankfully, Harry Potter waved his wand and increased the availability of these much-needed household items, so it shouldn’t be hard to find.

To make the filling (or innards, as they are called in our household):

1. Combine the corn syrup, earth balance, vanilla, and salt in a large bowl. Beat well with an electric mixer until smooth.

2. Add powdered sugar, one cup at a time, mixing by hand after each addition. Mix until creamy.

3. Remove about 1/4 of the mixture and place it into a small bowl. Add the yellow and red food coloring and stir well to combine.

4. Cover both mixtures and refrigerate for at least 2 hours, or until firm.

5.When mixtures have firmed, roll a small, marble-sized ball from the orange filling, and wrap around it a portion of the white filling that is roughly twice the size. Form this filling into the shape of an egg and place it onto a cookie sheet that has been brushed with a light coating of shortening. Repeat for the remaining filling ingredients, then refrigerate these centers for 3-4 hours or until firm.

You can eat the innards on their own pre-chocolate, as I did while Emma was out of town this past week. I don’t recommend eating more than one this way as my teeth nearly staged a coup. And honestly, they are nowhere near as delicious without the dark chocolatey coating (nor are they as cute as they are when froggy).

Get your chocolate on:

6. Combine the vegan chocolate chips with the shortening in a glass or ceramic bowl. Microwave chocolate on high speed for 1 minute, then stir - if your chocolate is still a little lumpy, microwave again for 30 seconds to a minute, and stir until smooth and lump-less (no one likes a lumpy frog).

If you were unable to locate a chocolate frog mold, or just really enjoy choose-your-own-adventures, please skip to the alternate, number 7 & 8 egg-shaped directions below.

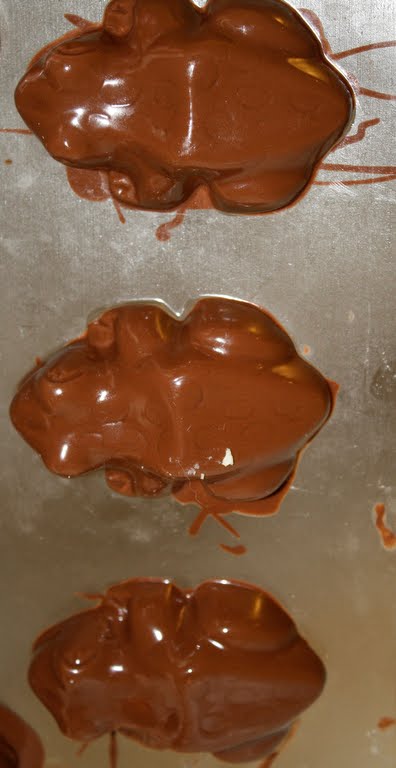
7. Spoon about a tablespoon of chocolate into the frog mold, enough to coat the little feet and face. Roll your center in your hand to make it a little flatter, and place it in your mold. Cover with another spoon full of chocolate. Chill.

8. After 2-3 hours of chilling, it’s time to eat. Makes 2 dozen candy frogs.


For an egg-shaped candy:

7. Use a fork to dip each center into the chocolate, tap the fork on the side of the bowl, then place each candy onto wax paper. Chill.

8. After 1-2 hours of chilling, dip each candy once more and chill for several hours, or until completely firm. Makes 2 dozen candy eggs.


I am deeply appreciative of Emma’s discipline. If she weren’t strong enough to maintain a firm rule that these are only allowed once a year – I would probably be found rocking on the kitchen floor drooling corn syrup on myself gleefully.

If you're finding that this blog post opened your eyes to the sugared debauchery hidden in the world of vegan cooking, and you feel that you're going to need another fix of this deliciousness soon. Rest assured, look what just arrived:


Yup. Vegan Twinkies. Coming soon.


original recipe source used for this veganized version of Cadbury Creme Eggs was found at Top Secret Recipes
... except it looks like they don't have it posted there any more, so its also here and here.


enjoy!
- em and em

Sunday, April 24, 2011

welcome Emily! and here's some hot toddy cupcakes...


welcome to the blog, Emily!

emily and i live together in a co-op group house in DC, where we share a garden and cook together often. over the past few months we've made many lovely things that we should've been blogging about, but because i don't really like writing and need someone to help with that, nothing has been posted. so emily is here to save the day! we're going to start posting together, so look out for some new posts coming soon.

here's an example of some of emily's creations:
tofu benedict!


thanks emily :)


in other news, the garden is starting to come back to life. we've had salads of spinach, red leaf lettuce, chard, dandelion greens, and cilantro. soon we will also have radishes, snow peas, and beets.


we also had a bunch of fresh lemons last month which we've made many things with, like these hot toddy cupcakes. one of our housemates got a box of her home grown lemons from CA shipped here for her birthday last month.

the recipe is an adapted version of the chai cupcakes mixed with the yellow/vanilla cupcakes from "vegan cupcakes take over the world" and the icing was a basic lemon buttercream icing with some whiskey added to it, then topped with sliced lemons drizzled with agave.

ok, more soon. hopefully!

happy spring.
~em and em

Monday, September 13, 2010

firestorm garden gazpacho

august was a lovely month of fresh summer veggies and september is looking pretty good too. i made a big batch of gazpacho the other day for my housemates with most of the ingredients coming from the garden and the rest from our CSA. i got this recipe from firestorm cafe, a worker owned cooperative restaurant in Asheville, NC. i live in a large vegan coop house so the recipes from firestorm cafe are perfect for us since we need to cook in large batches.

if you also often cook for large groups of vegetarians and vegans, then check out firestorms recipe page and the moosewood cooks for a crowd recipe book. both are really great resources for large vegetarian meals. moosewood also has some of their recipes online here.

here's the firestorm recipe:
1 cans Tomatoes, diced (#10 can- really large, get it in the bulk section at a food coop)
2 cup Onion, chopped
4 medium Cucumber, chopped
4 medium Bell pepper, chopped
2 bunches Basil, chopped (and/or Cilantro)
4 clove Garlic
¾ cup Olive oil
½ cup Lemon juice
½ cup Lime juice
¼ cup Apple cider vinegar
1 Tbl Italian seasoning
1 Tbl Pepper
1 Tbl Salt
1 Tbl Sugar
1 tsp Cumin
  1. Combine half of ingredients in the food process and blend thoroughly. When the mixture has been reduced to a diced consistency (no pieces larger than a lentil), add it to a soup sleeve.
  2. Repeat with the remaining ingredients.
  3. Chill and serve!


one thing i do differently with this recipe is i blend most of the ingredients seperately and then mix them together in a large bowl with a spoon. i find that this keeps the texture of all the different vegetables while still blending their flavors together. i also usually use fresh tomatoes instead of canned if i have them, and then add some tomato juice to make up for the loss of liquid. (so essentially i just combine the moosewood recipe with firestorm)

happy end of summer!

Sunday, August 22, 2010

can't be beet chocolate cupcakes

ok. here it is. everyone asks me about how to make these cupcakes so figured it was time for me to write a post about it. i call these the "can't be beet chocolate cupcakes." they are made with beets and chocolate and are surprisingly moist and extremely delicious. and vegan of course. i'm actually entering them into the DC state fair cupcake contest next weekend so right now i'm making a test batch for my friend's going away party.

the recipe used for this cupcake is adapted from the chocolate red velvet cake recipe in "ExtraVeganZa." the recipe calls for a cup and a half of of beets that are boiled and then blended with the water it was boiled in to make a creamy beet sauce. this is for the cake batter, which is what makes the cake so moist. for this part i'm using beets from my garden (local and organic!)


beets from my garden


beets blended with beet stock water

it also calls for beet powder, which is possible to make on your own, but it takes a really long time and requires more beets than i had in my garden, so i bought beet powder online instead. i couldn't find any in the stores nearby so i bough it online at the spice barn. i know, it seems crazy to mail order ingredients for a cupcake, but trust me its worth it.


beet powder from spice barn


dry ingredients for cake batter


dry ingredients mixed with wet and blended beets

after the cupcakes are cooked, i topped them with a chocolate ganache frosting. this is adapted from the "vegan with a vengeance" cookbook.


cupcakes topped with chocolate ganache

after adding the chocolate ganche, i let them chill in the fridge to set and then iced with "creamy fuchsia icing," also from ExtraVeganZa. this frosting is made creamy with the help of some cashew butter, and its colored fuchsia with a few teaspoons of beet powder (yay i get to use my mail order spices again!).

for the final topping, i made candied beets and sprinkled them on top of the cashew frosting with some chocolate powder. the candied beets are made by chopping the beets very finely and then boiling them in a little bit of water and sugar. once all the water dissolved i added more sugar, cooked it a little longer on low just to dry it out completely.


and that's all! here they are, the 4 topping cupcake...


can't be beet chocolate cupcakes


vegan chocolate beet cupcakes topped with a chocolate ganache, cashew cream frosting and candied beets

Tuesday, August 10, 2010

so many uses for sunflowers

sunflowers are here and they make everything look happier. one of the many great things they are good for. they also provide many sunflower seeds in one head, which is good for harvesting and eating, or for forgetting to harvest and watching the birds enjoy. and you can save the seeds to plant again next year, like on the international sunflower guerrilla gardening day! (may 1)

last year i grew 6 "grey mammoth" sunflowers and harvested 6 cups of sunflower seeds (and they really are mammoth-- about 10ft or more). i had plenty of seeds to plant in the garden, give to friends and family, and also to eat.


sunflower starting to bloom

to harvest sunflower seeds:
- wait till the flower pedals start to fall off the plant while its still in the ground
- then cut off the head of the sunflower, leaving yourself about 6-12" from the end of the head
- hang the head upside down by the stalk and let it dry out for 2 weeks
- after its dry, brush of the little flower bristles (not really sure what to call them) and you'll see all the seeds underneath
- then gently pull out the seeds by brushing your finger along the sides to push them out.
make sense kind of? see pictures below.


sunflower heads after being dried out for 2 weeks


the sunflower "bristles" that need to be brushed off to get to the seeds


lots and lots of sunflower seeds packed into one head


my mum's garden in NY from the sunflowers point of view


but there's also another great thing about sunflowers, and that's the stalks. they are very big and strong and they dry really well. last year i saved my sunflower stalks, dried them, and then used them as my snow pea trellis/tripod this year.

3 dried sunflower stalks with string wrapped around them to make a trellis

if the sunflowers were also the type that produce sunchokes, or Jerusalem artichokes, then you could eat the roots like a tuber or make flour. if you've ever seen pasta made with Jerusalem Artichokes, that's what it is, sunflower roots. i think i'll try that for next year, but for this year i have a ton of great seeds to work with. maybe i'll try to make sunflower oil?

Wednesday, June 2, 2010

salads for a change!

i realized today that i have only ever posted recipes and pictures of desserts that i've created. i do love to bake and eat desserts, but i promise i do sometimes eat vegetables when they aren't secretly baked into a cake!

in fact, i've been growing more lettuce and greens in the garden this year so that i can have a fresh salad greens around all the time.
(picture of lettuce and mustard greens growing in the front yard)


this was the first harvest of the year in mid-May

radishes and lettuce

here are some things growing in the garden that have gone into my salads lately:
lettuce
arugula
mustard greens
baby spinach and big spinach
radishes
snow peas


snow peas!


snow peas growing in the front yard on a tripod built from last year's sunflower stalks


fresh garden salad with homemade dressing

dressing ingredients:
olive oil
apple cider vinegar
tahini
brown mustard
agave
salt and pepper
fresh herbs: thyme, oregano, and whatever else is around
garlic


see! i do eat veggies in non dessert form sometimes.
only sometimes tho... :)